
Tim Holtz Distress markers are the BOMB!!
I recently saw a cool video tutorial by Jennifer McGuire that helped me understand how much I needed the Tim Holtz Distress markers!! I got right down off the fence and clicked Add-to-cart as fast as I could. When they came, I went ahead and tried this technique!
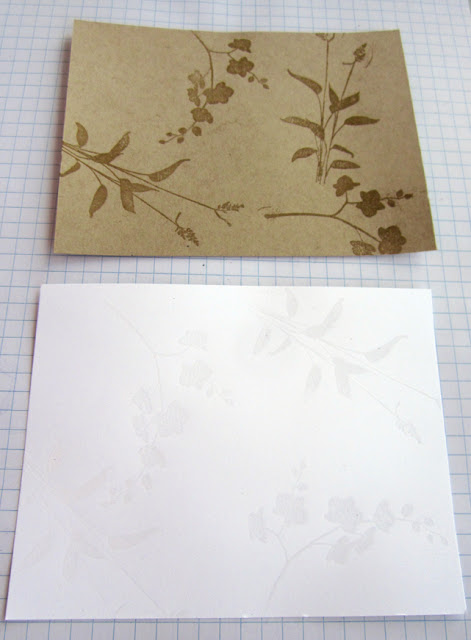
Stamp on 140lb cold-press water color paper with Versamark clear ink, emboss with white emboss powder and heat.
Color in the spaces in a random pattern with the color of your choice.
Mist fairly generously with water, dab randomly with a clean paper towel. Heat dry with an air gun or just let it air dry.
With this kind of a stamp you get the most beautiful stained glass window effect and if you were to add some Perfect Pearls Pigment powder to your water mist, the ink will dry with a gorgeous sheen. (I didn't have any Perfect Pearls, but we can take this tip on good authority from Jennifer!) You can see how the color "shared" from one space to the next because of using lots of mist spray.

Then I had to try another technique. I saw this over at SplitCoast Stampers and did a variation on the tutorial there. They used Distress re-inkers, but I used my new markers!!
I ran more 140lb cold-press (sounds like and Olive Oil process, no?) water color paper through an embossing machine (Big Kick, Big Shot, Cuttlebug, anything like that), several times to get a sharply raised design.
Then adhere the paper with re-positionable adhesive to a craft mat, and using brayer loaded up with Versamark, run it very carefully over the raised design. The idea is to get the raised part sticky enough for white embossing powder to stick to. (If you don't have a brayer, you could draw over the the raised design with an adhesive pen.) Before heat embossing the powder, use a dry, fine tipped paint brush, to remove the excess powder from the "recessed" part of the design. No matter how careful you are, there will be some Versamark overflow. (As you can see, I could have been much more thorough with brushing off excess emboss powder but I was too excited about what I could do with the Distress markers to spend the necessary time, lol.)
Now take your choice of Distress markers and color patches on your craft mat, or any other smooth non-porous surface, such as an acrylic stamp block. Use one paint brush to wet one area of your design, then with another paint brush that is wet (but not dripping), load up one color of Distress marker color. Paint that color into an area. You'll notice, if you have a nicely soaked area of paper, that you can just touch down the brush and the color will spread in a cool painterly way that makes you look way more talented than you actually are. Unless you're an accomplished water color painter. Then don't listen to me at all!
The ridges in the embossed design will act as a barrier to keep the colors localized. I like to start with the lightest color of ink and then go back and blend in a darker color on the edges or in the folds where they would naturally be darker.
Once dry, you can stamp on a sentiment, or use your design in any way you like.

I've decided that the only drawback to these markers is that there aren't more colors.... T!m, we NEED MORE COLORS!!
Recently posted for Love is in the Details.
Comments
Post a Comment